Reduce Sunglasses Tooling Risk Before You Cut Steel
This guide is for brand owners, importers, distributors, and retailers planning a new custom sunglasses model and trying to avoid preventable tooling loss. Once mold steel is cut, fixes get expensive fast. Common failures are basic: poor fit, front and lens curve mismatch, hinge placement errors, decoration choices that fail in production, or a volume plan that never supported a custom mold in the first place. The lower-risk path is staged validation: confirm the commercial case first, then dimensions and fit, then material behavior, then compliance, then tooling release. That order matters. It reduces rework, limits scrap, and protects margin at the quantities buyers can actually place.
Start With A Go-Or-Kill Decision, Not A Sketch
Many tooling losses start before mold design. A buyer approves a rendering because the front view looks strong. Later, the temple spread is weak, the bridge sits badly on the target wearer, or the cost at the real opening quantity does not work. Tooling does not fix a weak brief.
Before you approve any mold work, lock four operating numbers:
- Target landed cost per pair at the first realistic order quantity, not the hoped-for reorder quantity.
- Opening order volume such as 300, 1000, or 5000 pairs.
- Sales channel such as resort retail, optical-adjacent fashion, chain retail, or DTC, because each channel tolerates different fit, finish, and return rates.
- Required market standard such as CE EN ISO 12312-1 for Europe, ANSI Z80.3 for the US, or AS/NZS 1067 for Australia and New Zealand.
If those points are still vague, stop. A factory can sample a concept. It cannot build the business case for you.
Low-MOQ sampling or trial production can be useful for decoration tests, market checks, or modified versions of existing platforms. That does not mean a full custom mold makes sense at the same volume. Keep trial quantity separate from custom tooling quantity and ask the factory to quote both paths clearly.
A practical rule is simple: if you cannot show how the style works at your first real order quantity after freight, duty, testing, packaging, and expected returns, do not release tooling payment.
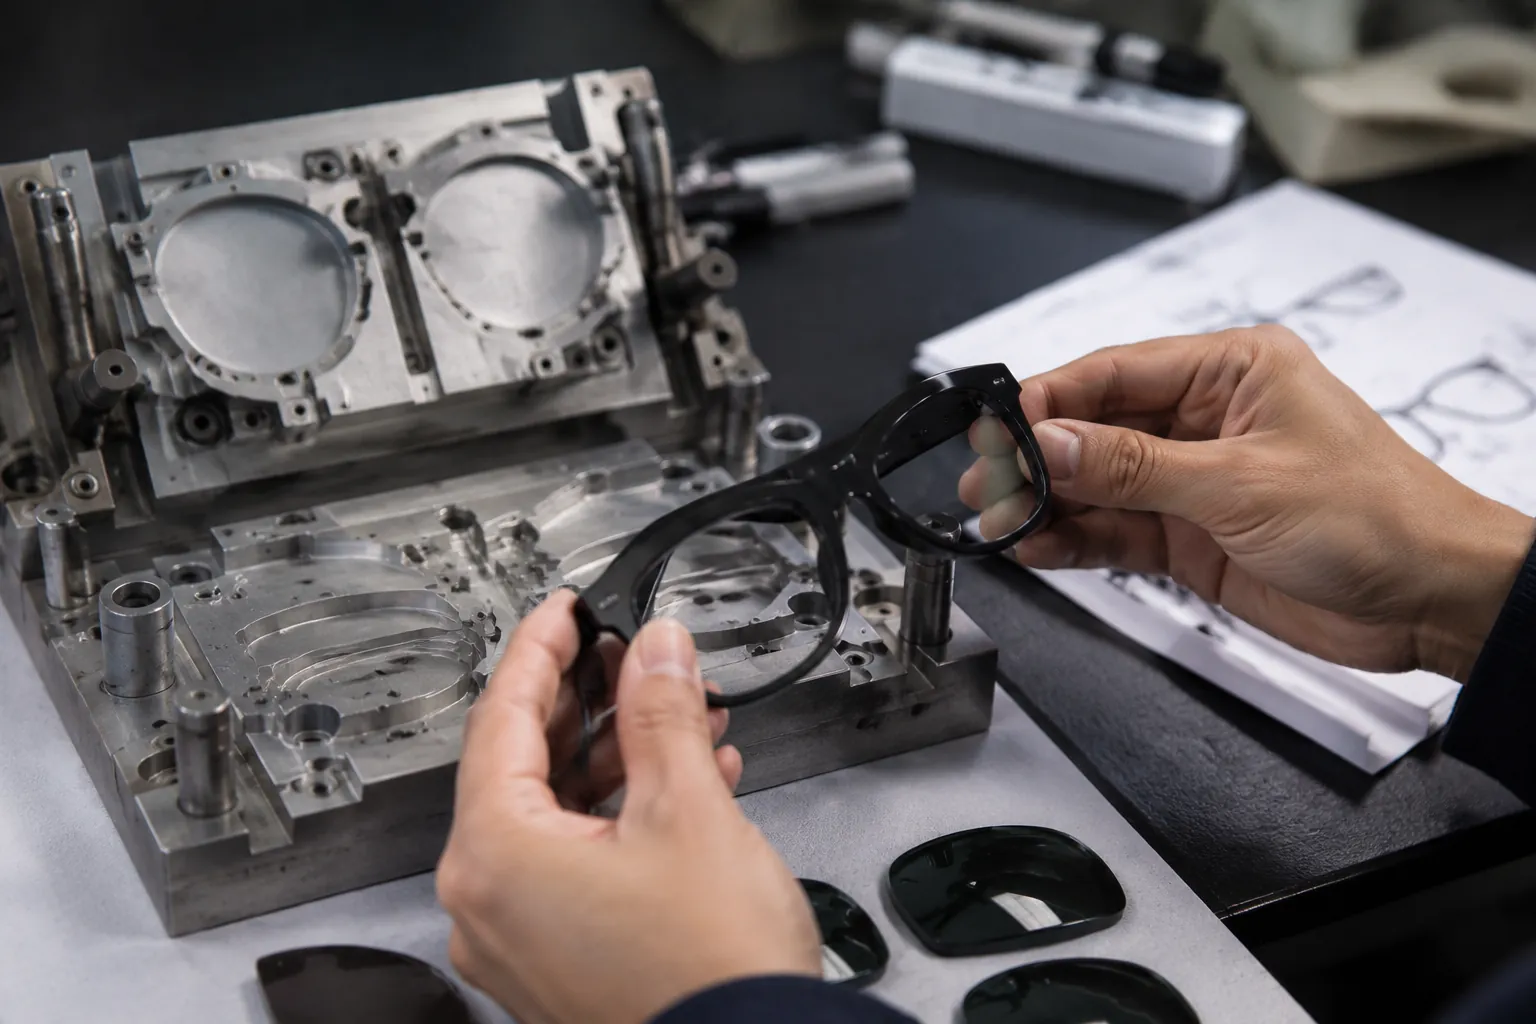
Use A Pre-Tool Sample Ladder
A disciplined sample sequence catches cheap mistakes before they turn into steel revisions. Buyers often try to jump from artwork to mold to save time. That usually costs time later.
- 2D tech pack review: lock front width, lens width, bridge width, temple length, base curve target, hinge type, logo position, and material callout. This stage should also flag wall-thickness concerns and lens insertion risk.
- 3D print or CNC appearance sample: verify visual proportion, eye coverage, brow line, temple angle, and branding scale. You need to see the frame on a face, not just on a screen.
- Functional hand-made or modified stock sample: check wear comfort, bridge contact, hinge opening feel, lens seating approach, and in-hand perception. If the concept only photographs well but feels unstable or cheap, find out here.
- Pre-production confirmation before mold: sign off final dimensions, lens color family, finish level, hardware tone, packaging assumptions, and decoration location tolerances.
Use sample lead time to collect evidence, not just photos. Ask for a dimension sheet with nominal measurements and tolerance notes. Request front, side, top, and worn photos on more than one face shape when possible. The review should answer practical questions: does the front sit level, do the temples close evenly, and does the bridge land where the target customer actually needs support?
If frame, lens, and decoration are handled by different suppliers, ask who owns final dimensional control. That point needs a clear answer. Problems such as lens fit stress or logo misalignment are harder to diagnose when development is split across vendors.
What You Can Validate Before Tooling
Not every product question needs a production mold. Strong buyers separate what can be proven now from what must wait for trial production. That distinction protects both time and budget.
| Risk Area | Can Validate Before Mold? | How To Check | Typical Failure If Ignored |
|---|---|---|---|
| Frame shape and visual proportion | Yes | 3D appearance sample, worn photos, dimension review | Style looks too heavy, too narrow, or visually unbalanced in real use |
| Basic fit and temple geometry | Mostly | Hand sample, fit trial, hinge spread and temple pressure check | Pressure at temples, loose retention, poor wrap on face |
| Material shrinkage and warpage risk | Partly | Material review, wall-thickness analysis, prior process data for the same material family | Twist, sink, lens seating stress, unstable dimensions after molding |
| Lens tint and category direction | Yes | Tinted sample lenses, transmission target review, destination-market standard check | Non-compliant tint, poor visibility, retesting delays |
| Decoration durability | Yes | Pad print, laser, foil, or logo plate sample with rub and adhesion checks | Logo rub-off, plating inconsistency, reject-heavy finish |
| Final cycle time and exact yield | No | Estimated only until mold trial | Unexpected unit cost after tooling is paid |
The goal is not to remove all uncertainty. You cannot. The goal is to remove the obvious mistakes while they still cost sample money instead of mold money.
Shape, Fit, And Tolerance Failures That Cost Money
Buyers often focus on the front view because that is what sells the design internally. Production teams look harder at side view, section thickness, and tolerance stack. That is usually where trouble starts.
Common technical failures include:
- Bridge fit is wrong: a bridge can look acceptable in CAD and still slide on a low bridge or pinch on a higher bridge. Review both bridge width and bridge profile, not just one number.
- Temple start point is misplaced: moving the hinge line by only a few millimeters can change pressure distribution, visual balance, and cheek clearance.
- Front curve and lens curve are mismatched: when the frame front is too flat or too wrapped for the planned lens, lens insertion stress rises and cosmetic distortion can become visible.
- Wall thickness is inconsistent: sudden thick-to-thin transitions increase the risk of sink, warp, and cooling imbalance in injection programs.
Ask for a dimension sheet, a side-profile review, and nominal tolerance guidance before tooling is frozen. Exact tolerances depend on material, structure, and process, so treat any single number as style-specific. In practice, visual symmetry, lens seating, and temple opening consistency often matter more than one headline catalog measurement.
For injection styles, ask for wall-thickness guidance tied to the actual resin and structure. For acetate programs, ask where CNC milling removes material and where polishing softens edges. That matters. Many designs depend on a sharp corner or crisp bevel that production finishing will not hold exactly the same way.
QC criteria should reflect the style's real failure points: lens rim symmetry, bridge contact shape, temple opening consistency, hinge alignment, and logo position. A generic cosmetic checklist is not enough.
Material Choice Changes Tooling Risk Fast
The same silhouette behaves very differently in injected plastic and acetate. Treating those routes as interchangeable is a common buyer mistake.
| Option | Best For | Main Risk Before Mold | Buyer Checkpoint |
|---|---|---|---|
| Injection molded plastic | Volume programs, repeatability, lower unit cost at scale | Shrinkage, sink marks, and warp if geometry is poorly balanced | Review wall thickness, hinge reinforcement, gate logic, and molding assumptions |
| Acetate cut and CNC milled | Higher perceived value, layered colors, thicker styling | Color variation, polishing loss on sharp detail, higher labor content | Approve real acetate sheet color, edge finish, bevel, and hand-feel sample |
| Mixed-material frame with added metal decoration | Brand-led collections with stronger identity | Assembly complexity, cosmetic alignment risk, higher reject rate | Confirm decoration method, attachment tolerance, and rub resistance |
Injection can support better economics at scale, but only if the geometry is realistic for molded plastic. Acetate can deliver more visual depth, layered color, and a more premium tactile feel, but it adds labor, finishing variation, and material cost.
Decoration method matters too. Pad printing is efficient for logos, but it needs position control and durability checks. Laser engraving is durable on suitable surfaces, but the visual result differs from ink. Hot foil can look premium, but process control matters. Metal logo plates can strengthen branding, but they also add assembly steps, alignment risk, and cosmetic rejects.
If the cost target is tight, do not approve an acetate-led design and expect injection economics without visible compromise. Ask the supplier which details depend on the chosen material and which details will change if the process changes.
Build Compliance In Early
Compliance is not paperwork collected at the end. It starts with design inputs: lens category target, UV protection requirement, material selection, and destination market. Delay those decisions and you increase the odds of reworking lens color, relabeling product, or repeating testing.
For overseas buyers, the baseline questions are usually:
- Will the product be sold into Europe and require alignment with CE EN ISO 12312-1?
- Will it go into the US and need conformance planning around ANSI Z80.3 and FDA registration where applicable?
- Will it be sold into Australia or New Zealand and need AS/NZS 1067 planning?
- Do materials, coatings, inks, or other inputs require REACH review?
Supplier credentials such as ISO 9001 or BSCI can be useful indicators of management systems or audit status, but they do not replace product-specific compliance work. The buyer task is simpler than it sounds: confirm which market standard applies to the SKU, then freeze lens and material decisions around that requirement before mold release.
Also ask how QC checks connect to compliance-sensitive points. That includes lens tint consistency, lens retention, hinge assembly integrity, labeling accuracy, and packaging traceability. If the answer is vague, the program is not ready for tooling. A dark lens that looks good in photos but misses the intended transmission range means retesting and delay.
Run The Commercial Math Before You Pay Tooling
Tooling should follow order logic, not sample excitement. Some frames look good and still should not move forward because the volume plan is too weak to recover mold cost and test expense.
Use a simple buyer worksheet:
- Estimate first 12-month volume by channel, using realistic sell-through assumptions.
- Quote the style at 300, 1000, and 5000 pairs with exact material, lens, packaging, and decoration assumptions fixed.
- Add all non-unit costs including tooling, samples, compliance testing, packaging, freight, duty, and inspection.
- Stress-test the model at lower-than-expected sales to see whether the program still clears your margin threshold.
This is where MOQ and lead time matter. Trial quantities, sample timelines, and bulk lead times are useful planning inputs, but they do not justify tooling on their own. A weak-volume style is often better handled through modified existing platforms, decoration-led differentiation, or low-risk shape changes until the market proves itself.
The core question is blunt: can this style sell in enough volume to recover tooling, pass testing, absorb freight and duty, and still leave room for margin on the reorder? If the answer is weak, wait.
A Pre-Tooling Checklist Buyers Should Actually Use
Before you release tooling payment, get direct yes-or-no answers on each of these points:
- Dimensions approved: front width, bridge width, lens width, temple length, and frame depth are signed off from a measurement sheet.
- Fit reviewed on real faces: not only CAD or tabletop photography.
- Material fixed: injection or acetate is confirmed, with finish expectation documented.
- Lens spec fixed: color family, category target, and market requirement are aligned.
- Decoration method approved: pad print, laser engraving, foil, or metal logo plate is chosen with placement tolerance agreed.
- Price ladder reviewed: unit cost at 300, 1000, and 5000 pairs is commercially acceptable.
- Lead time accepted: sample and bulk timing fits the launch calendar.
- QC points written: symmetry, fit, lens seating, logo position, and cosmetic standards are defined.
- Compliance path checked: CE EN ISO 12312-1, ANSI Z80.3, AS/NZS 1067, REACH, and FDA relevance have been confirmed by destination market.
If several of those items are still soft, wait. A short delay before tooling is usually cheaper than revising a bad mold, scrapping decorated parts, or launching a style that should have stopped at sample stage.
Have a custom sunglasses project in mind?
Send us your styles, target market and quantities and we will return a detailed quote with MOQ, lead time and a sample plan.
Get a QuoteWhy source this from Wenzhou with LumiShades
Wenzhou in Zhejiang Province is widely regarded as China’s eyewear manufacturing capital, producing a large share of the world’s sunglasses. That concentration matters to buyers: a deep local supply chain for acetate sheet, hinges, lens blanks, plating and packaging means shorter component lead times, easier color and material matching, and a workforce with decades of eyewear-specific skill. LumiShades has manufactured in this ecosystem since 2009, and our vertical integration — in-house injection molding, acetate cutting, CNC milling, lens tinting, decoration and quality control — means no part of your order is quietly subcontracted to a workshop you cannot audit.
For international buyers, that vertical control translates into accountability. When a single factory owns every step, defects are traced and fixed at source rather than bounced between vendors, and your specifications survive intact from first sample to bulk. We back this with 15+ years of experience, shipments to 60+ countries, more than 5 million pairs produced per year and a 98.5% on-time delivery rate. Our certifications — CE EN ISO 12312-1, FDA registration, ANSI Z80.3, AS/NZS 1067, REACH, ISO 9001 and BSCI audit — mean the compliance documentation your market requires already exists. Explore our manufacturing capabilities and quality control process to see how this works in practice.
Frequently asked questions
How many samples should I approve before opening a new mold? In most programs, approve at least two stages before tooling: one appearance or dimensional sample to confirm shape and proportion, then one functional confirmation sample tied to the intended material, lens approach, and decoration method. Add another round if the bridge is unusual, fit is critical, the frame uses mixed materials, or compliance-sensitive lens specifications are still moving. Before you release tooling, make sure you have a signed dimension sheet, worn evaluation, and written confirmation of material and lens direction.
Can I test market demand before paying for custom tooling? Yes. The usual low-risk route is to start with an existing platform, modify color or decoration, and place a trial order to measure sell-through, returns, and price acceptance. If the style proves itself, you can then compare the economics of staying on a platform versus opening a custom mold. Keep the market test separate from the tooling decision and ask for separate quotes, lead times, and compliance implications for each route.
What is the biggest technical mistake buyers make before tooling? Approving shape from renderings without checking side profile, bridge fit, temple angle, and lens curve relationship on a real sample. The front view often sells the concept internally. The side view usually exposes the production risk. Require worn photos, nominal dimensions, and a functional sample review before authorizing mold steel.
How long should I allow from approved sample to bulk shipment? There is no single standard timeline because material route, decoration complexity, testing needs, and packaging all affect the schedule. Ask for a stage-by-stage plan that separates sample revision time, mold making, mold trial, testing if required, production, inspection, and shipment. Do not rely on one headline lead time. Identify which steps are on the critical path and which approvals must be frozen before bulk can start.
Which compliance documents matter most for sunglasses exports? That depends on the destination market and the exact product claim. Common reference points include CE EN ISO 12312-1 for Europe, ANSI Z80.3 for the US, AS/NZS 1067 for Australia and New Zealand, REACH for chemical compliance considerations, and FDA registration relevance in the US where applicable. First confirm the destination market, then ask the supplier which test reports, declarations, labels, and traceability records will support that SKU. Do not rely on general factory certificates alone. Ask for product-specific compliance evidence tied to the lens, material, and market.
Ready to start?
Explore our round sunglasses or request a quote — our sales team replies within 12 hours.
Request a Quote