Sunglasses Tags, Stickers, and Inserts That Convert
This guide is for eyewear brands, importers, distributors, and retailers buying custom sunglasses at volume. The goal is simple: use low-cost printed pieces to answer the questions shoppers, store staff, and compliance reviewers actually ask. At shelf. In-store. During unboxing. A clear hangtag, lens sticker, and insert set can improve product clarity, support accurate claims, and help entry-level frames present better without changing the frame itself. Poorly handled print does the opposite. It creates confusion, slows packing, causes SKU-level claim mismatches, and raises the risk of retailer rejection or customs questions. The good part is control. With a clear content split, practical physical specs, and a disciplined approval process, these printed assets become an operations tool, not decoration.
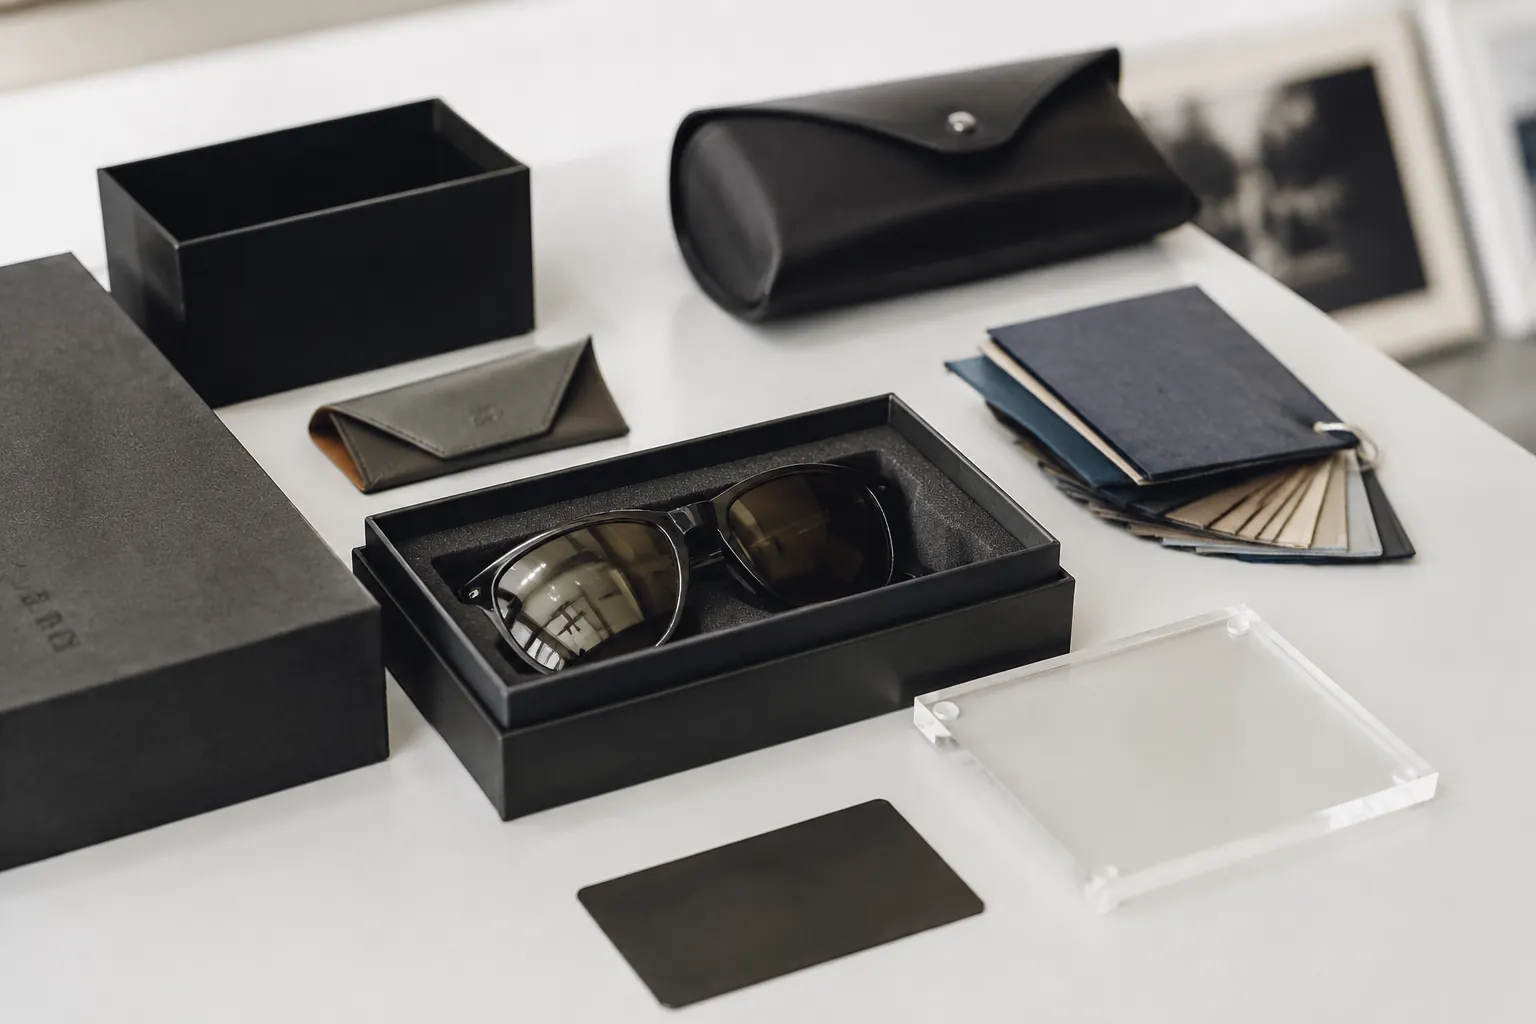
Start with the job of each printed piece
Buyers often group hangtags, stickers, and inserts into one packaging task. That is the first mistake. Each piece does a different job in retail and on the packing line. Mix those jobs together and you get crowded copy, weak hierarchy, and more handling errors.
The hangtag is the fast read. It should identify the product and land one or two verified selling points in a few seconds. The sticker carries one short claim only, ideally visible before the shopper removes the frame from the pouch or display hook. The insert is the deeper layer. Use it for care instructions, material details, included accessories, origin, and market-specific wording where required.
For most private label sunglasses programs, the cleanest split looks like this:
- Hangtag: brand name, model or collection name, one feature headline, barcode or SKU, and origin if the channel requires it.
- Lens sticker: one short claim such as UV400, Polarized, or Cat. 3, in large type with removable adhesive.
- Insert card: care instructions, frame and lens material, included items, warranty summary, country of origin, and exact technical wording tied to the approved product file.
This is not just a copy decision. It is a packing decision too. In mixed production runs, the most common print errors are wrong stickers on the wrong SKU, missing inserts, and feature claims copied from an older style. A disciplined split helps prevent those mistakes because each printed piece has one job and one clear SKU link.
Keep the hangtag front short. Keep the sticker to one claim. Keep the insert focused on information shoppers or retailers will actually use. If the message still feels crowded, simplify the product story before artwork starts.
Build the message stack from shelf to checkout
Design printed assets in the order the shopper experiences the product: first glance, pick-up moment, final decision, then post-purchase reference. That creates a message stack instead of three disconnected blocks of text.
- First glance: state a short product promise. Examples: Polarized TAC Lens, Lightweight TR90 Frame, Handmade Acetate Front.
- Pick-up moment: add proof that supports the promise. Common proof points include UV400, Category 3 lens, spring hinge, or anti-scratch coating if that coating is part of the approved specification.
- Final decision: give reassurance. Use the insert to explain materials, care, included accessories, and exact market wording where required.
- After purchase: reduce confusion and returns. The insert should tell the user how to clean the lenses, how to store the frame, and what conditions to avoid.
Literal feature language usually works better than broad lifestyle copy. It is faster to read and easier for retail staff to repeat correctly. Polarized TAC Lens says more than a vague line about comfort or performance.
Match every feature line to the actual bill of materials. If the frame is injection-molded PC with tinted AC lenses, say that. If it is an acetate front with polarized TAC lenses, say that. Packaging should mirror the approved specification sheet and test-backed claims. Nothing else.
A useful B2B rule is to rank messages by commercial value:
- Tier 1: what the customer buys first, such as polarized lens or acetate frame.
- Tier 2: supporting proof, such as UV400 or spring hinge.
- Tier 3: support information, such as care, origin, warranty summary, and technical references.
When Tier 3 content creeps onto the front of the hangtag, readability drops fast.
What to print, where to print it, and what to leave out
Most sell-through problems do not start with graphic style. They start with weak information hierarchy or claims copied forward without checking the actual style spec.
| Piece | Best use | Recommended content | What to avoid |
|---|---|---|---|
| Hangtag | Fast retail read | Brand, model, one or two verified features, barcode, origin if channel requires it | Long care text, full technical wording, dense brand story |
| Lens sticker | Single short claim | UV400, Polarized, Cat. 3, removable adhesive note | Multiple claims in one sticker, aggressive adhesive, oversized shapes that can mark the lens |
| Insert card | Detailed explanation | Care, materials, what is included, warranty summary, compliance references where appropriate | Tiny type, low contrast, conflicting feature claims |
| Pouch card | Accessory support | Microfiber use instructions, accessory count, SKU reference | Replacing the main insert when technical information is needed |
Leave out anything you cannot support with an approved specification, supplier record, declaration, or relevant test document. That includes unsupported environmental claims, unverified performance language, and standard references copied from another style family. If a style is sold into Europe and supported for the destination market under CE EN ISO 12312-1, the printed wording should match that exact style or approved product family. The same rule applies to ANSI Z80.3, AS/NZS 1067, REACH, FDA registration, ISO 9001, and BSCI.
It also helps to separate retail claims from buyer documentation:
- Retail claim: Polarized, UV400, TR90 frame, Acetate front.
- Buyer-pack document item: ISO 9001, BSCI, REACH declaration, FDA registration context, test report reference.
- Technical insert wording: exact destination-market standard reference where appropriate.
Strong printed assets do not try to sound impressive. They stay precise, consistent, and easy to verify.
Get the physical specs right
Artwork is only half the job. Physical format affects packing speed, lens cleanliness, transit performance, and defect risk. A good layout with the wrong stock, string, or adhesive still creates problems.
For hangtags, common working sizes are 50 x 90 mm, 55 x 85 mm, and 60 x 100 mm. For many fashion sunglasses, 50 x 90 mm gives enough room for a front feature panel and a back barcode without overpowering the frame. Paper stock in the 250 to 350 gsm range is common. Around 300 gsm coated art card is widely used because it balances stiffness and print quality. Lighter stock bends too easily at the punch hole. Very heavy stock adds bulk and increases the chance of lens contact during packing and transit.
If the hangtag uses a string, hole position matters. A punched hole 4 to 5 mm from the edge is common. Too close and it tears more easily. Too far in and it wastes layout space. Elastic cord, cotton string, and plastic fastener loops all work, but they behave differently in production. Elastic is quick to apply but can snap back toward the lens. Cotton can look better but may tangle more around hinges. Plastic loops are consistent and cost-effective but often look more mass-market.
For lens stickers, adhesive choice is critical. A sticker that looks fine on a sales sample can still leave residue or a visible ring after storage, especially on mirrored coatings or other treated lens surfaces. Ask for a removable adhesive intended for temporary lens use, then test it on the actual lens construction and coating used for that SKU. Check at room temperature and after warm storage. Then remove it and inspect for residue, ghost marks, or coating disturbance.
For inserts, the main issues are fold logic and insertion speed. A flat card of 70 x 100 mm or 80 x 120 mm often works well in pouches and compact cartons. If folding is required, a bi-fold is usually easier to handle than a tri-fold and often reduces insertion problems on higher-volume runs.
| Component | Common spec | Operational advantage | Main risk if wrong |
|---|---|---|---|
| Hangtag stock | 250-350 gsm paper card | Good stiffness and print clarity | Too light bends; too heavy can increase lens contact risk |
| Lens sticker adhesive | Removable adhesive for temporary lens use | Cleaner removal after packing and transit | Residue, coating marks, customer complaints |
| Insert format | Flat or bi-fold card | Faster insertion and lower packing complexity | Tri-fold buckling or slower handling |
| Tag attachment | Plastic loop or short cord | More consistent assembly | Tangling at hinges, lens contact, tearing |
Do not approve packaging from a flat PDF alone. Request a packed sample with frame, sticker, tag, insert, pouch, and outer retail pack assembled together. That is where the real issues show up: tag corners touching lenses, strings catching on hinges, inserts buckling in cartons, or stickers overlapping curved lens edges.
Use compliance language carefully
Compliance wording has two audiences: regulators and shoppers. Good packaging respects both without turning the product into a legal paragraph.
For shopper-facing print, plain wording usually works best. UV400 Protection is clear. Polarized Lens is clear. If the destination market requires a lens category disclosure, present it in a simple, consistent format. Do not crowd the hangtag front with standard numbers unless the channel specifically expects them there.
The insert is usually the right place for a small technical block that matches the approved product file. Typical items include lens material, frame material, manufacturing origin, importer details where required, and an exact reference to the relevant destination-market standard if that reference belongs on consumer-facing print.
- CE EN ISO 12312-1: commonly used for sunglasses sold into Europe when supported by the correct product documentation.
- ANSI Z80.3: commonly referenced for sunglasses programs aimed at the US market.
- AS/NZS 1067: relevant for Australia and New Zealand programs where applicable.
- REACH: usually a material compliance and documentation topic for Europe, not a consumer performance benefit.
- FDA registration: a buyer documentation item, not a lens performance claim.
Keep system certifications in the right lane. ISO 9001 and BSCI describe management system or social compliance context. They do not describe optical performance and rarely belong as front-of-tag retail claims.
A practical format is to split the insert into two sides:
- Side A: user benefit and care, in plain language.
- Side B: technical and origin details, written exactly to the approved market file.
This reduces clutter and keeps the product defensible. Too much technical copy on visible packaging makes the item harder to sell and does not improve compliance control.
Cost, lead time, and version control
Printed assets are inexpensive compared with frame tooling changes, mold revisions, or lens upgrades. That is why they matter in private label programs. They can improve retail clarity without changing product engineering.
Still, unit economics depend on format discipline. Standard sizes with artwork changes only are usually the cheapest route. SKU-specific dimensions, multiple language versions, and specialty finishes tend to raise both cost and error risk.
| Item | Typical sourcing logic | Cost effect | Lead-time effect |
|---|---|---|---|
| Simple hangtag, 1-2 colors | Shared size across styles, barcode variable only | Low added cost per pair | Minor if artwork is approved early |
| Custom shape tag with eyelet and string | Higher visual impact, more handling steps | Higher print and packing cost | Adds die-cut and assembly time |
| Lens sticker | Low material cost, high messaging value | Usually cost-effective when one claim runs across volume | Requires adhesive testing before bulk use |
| Insert card with care text | One insert can often cover many SKUs | Low cost when dimensions stay fixed | Minimal impact if language is frozen early |
For private label programs, print efficiency usually improves when buyers standardize tag shape, insert size, and paper stock across a collection and change only the barcode, color code, or verified feature line where needed. Fewer format changes mean fewer setup changes and fewer packing mistakes.
Lead time is often lost in artwork revisions, not print capacity. If barcode data, multilingual wording, or market-specific compliance text stays open after sample approval, the print file becomes the bottleneck even if frame production is on schedule.
Useful cost-control habits include:
- Standardize dimensions across a collection.
- Use one insert master for several colorways or lens variants where the technical content is the same.
- Limit foil, spot UV, embossing, and special die-cuts to premium programs where margin supports the extra complexity.
- Freeze barcode data and destination wording before pre-production.
The rule is simple: standardize the format, customize only the message blocks that must change, and lock technical wording before bulk production starts.
Run a tighter approval process
The cleanest programs follow a strict approval path. Wrong print is one of the easiest ways to delay shipment, fail a retailer check, or trigger avoidable claims after delivery.
- Confirm target markets first. Europe, the US, Australia, and mixed-channel programs may require different wording, importer details, or standard references.
- Lock the product specification. Frame material, lens material, filter category, finish, and feature list should be final before copywriting starts.
- Write one master content sheet. Include every approved claim, exact spelling, barcode data, color code, origin wording, and language version.
- Build artwork by piece. Do not let the designer copy technical claims from old files or improvise standard references.
- Approve a physical mock-up. Review the fully packed sample, not just digital artwork.
- Run pre-production checks. Verify barcode scan, print color, string attachment, sticker removability, insert count, and claim-to-SKU match.
- Check packing SOPs. Make sure the line knows exactly which sticker and insert belong to which lens variant.
- Pull a final packed carton sample. Randomly inspect a small set of finished units before mass sealing.
In practical QC terms, buyers should ask the supplier to verify at least these points before shipment:
- Barcode scan rate: test multiple pieces from each print batch.
- Sticker alignment: avoid placement across the lens edge radius or over areas prone to lifting.
- Claim accuracy: polarized stickers only on confirmed polarized SKUs.
- Count control: one insert and one tag per pair unless the program specifies otherwise.
- Cosmetic risk: no string abrasion, no tag corner contact on lenses, no visible sticker residue on checked samples.
Treat printed assets as part of the product file, not as a last-minute add-on. That discipline removes a large share of avoidable rework.
Keep the insert useful
A good insert card is short, specific, and useful after purchase. Many buyers overestimate how much brand story consumers want and underestimate how much they value care instructions that help prevent scratches, coating damage, and unnecessary returns.
The strongest inserts usually contain four content blocks: what the product is, which verified features it includes, how to care for it, and what the user should avoid. That last block matters. Many complaints come from use conditions, not manufacturing defects.
A strong insert usually includes guidance such as:
- Clean with microfiber only or a suitable lens cloth.
- Avoid paper towels, tissues, and harsh cleaners that can mark lenses or damage coatings.
- Do not leave in high heat such as a sealed car dashboard environment.
- Store in pouch or case when not in use.
- Check printed lens feature wording later if the customer needs to confirm whether the style is polarized or the labeled category.
If you want a brand story, keep it brief. It should support the product, not replace care and feature clarity. A useful insert is not a brochure. It is a compact care guide plus a technical support card.
Strong insert logic: one side for user benefit and care, one side for technical and compliance support.
That split works because it serves three audiences at once. Shoppers understand how to use the product. Retail staff can answer quick questions. Operations teams get fewer avoidable complaints about cleaning damage, confusion over polarization, or uncertainty about what was included in the package.
Printed components can do real commercial work, but only if they are specified and written like part of the product itself.
Have a custom sunglasses project in mind?
Send us your styles, target market and quantities and we will return a detailed quote with MOQ, lead time and a sample plan.
Get a QuoteWhy source this from Wenzhou with LumiShades
Wenzhou in Zhejiang Province is widely regarded as China’s eyewear manufacturing capital, producing a large share of the world’s sunglasses. That concentration matters to buyers: a deep local supply chain for acetate sheet, hinges, lens blanks, plating and packaging means shorter component lead times, easier color and material matching, and a workforce with decades of eyewear-specific skill. LumiShades has manufactured in this ecosystem since 2009, and our vertical integration — in-house injection molding, acetate cutting, CNC milling, lens tinting, decoration and quality control — means no part of your order is quietly subcontracted to a workshop you cannot audit.
For international buyers, that vertical control translates into accountability. When a single factory owns every step, defects are traced and fixed at source rather than bounced between vendors, and your specifications survive intact from first sample to bulk. We back this with 15+ years of experience, shipments to 60+ countries, more than 5 million pairs produced per year and a 98.5% on-time delivery rate. Our certifications — CE EN ISO 12312-1, FDA registration, ANSI Z80.3, AS/NZS 1067, REACH, ISO 9001 and BSCI audit — mean the compliance documentation your market requires already exists. Explore our manufacturing capabilities and quality control process to see how this works in practice.
Frequently asked questions
Should UV400 be on the hangtag, the sticker, or both? Use the sticker for immediate visibility. Repeat the claim on the hangtag or insert only if the wording stays identical across all pieces. Before printing, confirm that the claim matches the approved product file for that SKU and that your retail team is not mixing UV400 wording with a different lens category or feature claim on the same style.
Can I print CE EN ISO 12312-1 on every sunglass tag? No. Print it only when the exact style or approved product family is supported for the destination market by the correct documentation and your compliance team agrees that the reference belongs on consumer-facing packaging. Do not copy the standard reference from another SKU, an old artwork file, or another supplier sample. If you are unsure, keep the technical reference on the insert or in buyer documentation until it is verified.
What is the safest way to handle polarized labeling? Set up a separate polarized label control at SKU level. Use a dedicated sticker or a clear hangtag feature line only on confirmed polarized SKUs, then repeat the same wording on the insert. In production, require the supplier to match the sticker code, insert version, and packing list against the polarized bill of materials before sealing cartons. This is the simplest way to reduce mixed-run packing errors.
How early should I finalize artwork if bulk lead time is 25 to 35 days? Finalize all print content before bulk production starts, ideally during sample approval. At minimum, lock barcode data, language versions, origin wording, and any destination-market technical references before pre-production. If those items stay open after the frame is approved, the print file can delay shipment even when the sunglasses themselves are ready.
Is it better to make a different insert for every colorway? Usually no. Keep one insert format across the style and change only the elements that must vary, such as SKU code, barcode, language version, or a lens feature line tied to that colorway. Before creating multiple insert versions, check whether the frame material, lens material, care text, and compliance wording are actually different. Fewer versions mean lower setup cost, faster approval, and less risk of the wrong insert being packed.
Ready to start?
Explore our wayfarer sunglasses or request a quote — our sales team replies within 12 hours.
Request a Quote