Custom Sunglasses Sample Approval Checklist
This guide is for overseas brands, importers, distributors, and retail buyers who review custom sunglasses samples before bulk production. The sample stage is your last practical chance to confirm fit, dimensions, lens performance, color standards, logo durability, packaging, labels, and compliance details before corrections become expensive. Use this checklist to approve written, measurable requirements. Do not rely on memory, photos, or assumptions.
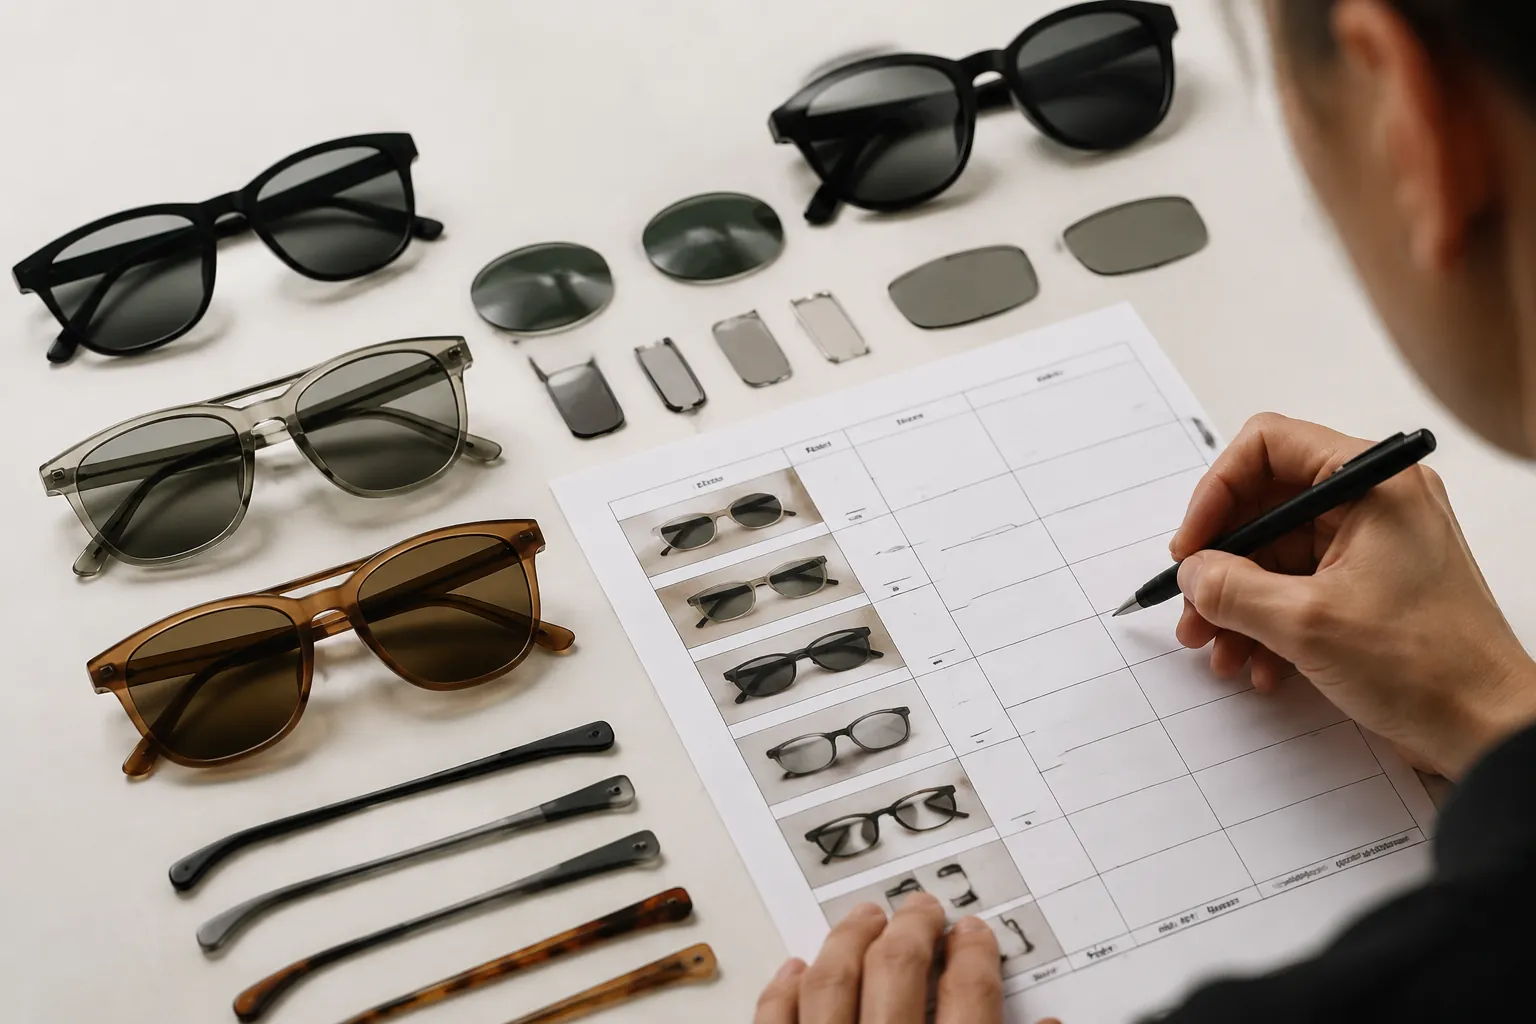
Start With a Written Approval Sheet
Do not approve a custom sunglasses sample only because it looks good in a photo or feels acceptable on a desk. Approve it because it matches a written standard. Create one approval sheet for each model, colorway, lens option, logo version, and packaging version before bulk production starts.
The approval sheet should list the model code, frame material, lens material, lens category, frame color, lens color, hinge type, logo method, logo position, packaging components, barcode format, destination market, target order quantity, and agreed tolerances. Add clear photos of the approved sample from the front, side, top, inner temple, hinge, lens, pouch, box, barcode label, and shipping mark. Photos help. They are not the standard by themselves.
Do not leave compliance markings and documents until the end. If the sunglasses are for the EU, US, Australia, or New Zealand, check the relevant product requirements during sampling. Common references include CE marking supported by EN ISO 12312-1 for the EU, ANSI Z80.3 and FDA registration status for the US, AS/NZS 1067 for Australia and New Zealand, and REACH support for restricted substances. ISO 9001 and BSCI relate to factory management and social compliance. They do not prove that a specific sunglasses model meets product safety requirements.
Buyer rule: If a requirement is not written on the signed sample approval sheet, it is not a controlled production requirement.
Check Fit, Dimensions, and Comfort
Fit should be checked early. Later changes can be slow and costly once molds, CNC files, acetate cutting programs, or metal tooling are fixed. For injection frames, tooling and molding conditions affect front width, bridge, lens groove, temple angle, and end-piece geometry. For acetate frames, sheet thickness, CNC cutting, tumbling, heating, polishing, and hand adjustment all influence the final fit. For metal frames, soldering, plating, rim locking, and hinge alignment affect symmetry and comfort.
Measure the sample. Do not only try it on. Use calipers for lens width, bridge width, temple length, frame front width, lens height, nose bridge opening, hinge position, and temple tip spread. Record the approved dimensions and tolerances on the approval sheet. Set tolerances by model and material. Thin metal frames, shield lenses, rimless styles, wrap frames, and tight snap-in lens grooves need different control points from standard plastic fashion frames.
- Open and close both temples repeatedly; hinges should feel smooth without scraping, wobble, or sudden looseness.
- Place the frame on a flat table; both temple tips should touch evenly without visible twisting.
- Wear the sample long enough to check nose pressure, temple squeeze, cheek contact, eyelash clearance, and slipping.
- Confirm lenses sit fully in the groove with no rocking, edge gaps, stress whitening, or pressure marks.
- Compare left and right temple angles; visible asymmetry can make the frame sit crooked on the face.
If the order is for more than one market, define the target fit clearly: adult, teen, Asian-fit, European-fit, oversized fashion, sport wrap, narrow retail fit, or another agreed profile. A frame that works in one market may slide, pinch, or sit too close to the cheeks in another.
Freeze Color Standards Before Production
Color approval needs a physical standard. Screen photos are not enough. Transparent materials, tortoise patterns, gradient lenses, and mirror coatings change under different lighting and camera settings. Matte black may be simple. Crystal champagne, smoke gray, milky pink, dark tortoise, brown gradient lenses, and mirror lenses need tighter control.
For injection frames, color depends on resin grade, masterbatch ratio, molding temperature, cooling time, and surface texture. A resin or masterbatch change can make transparent colors look warmer, colder, cloudier, or more yellow. For acetate, color and pattern vary by sheet lot; two tortoise sheets may both be acceptable but not identical. For lenses, dye concentration, dipping time, base material, hard coating, and mirror coating all affect the final appearance.
Approve color under consistent light, such as daylight and neutral indoor white light. If your brand uses Pantone, provide it for printed items. Still approve a physical chip, prior product, or signed master sample. Pantone references work better for ink and printed packaging than for transparent frames, tinted lenses, and coated lenses.
| Item | What to Approve | Typical Risk | Practical Control |
|---|---|---|---|
| Injection frame | Resin color, gloss, transparency | Batch drift or cloudy clear color | Keep a signed master sample and material reference |
| Acetate frame | Sheet pattern, thickness, polish | Pattern variation across sheet lots | Approve an acceptable light and dark pattern range |
| Tinted lens | Shade, darkness, gradient height | Left-right mismatch or incorrect visible light transmission | Check both lenses on white paper and confirm the lens category |
| Mirror lens | Mirror color, reflectivity, edge finish | Pinholes, color shift, weak edge coating | Inspect under angled light before and after assembly |
| Printed packaging | Logo color, barcode, text | Ink variation or unreadable barcode | Scan the barcode and approve the printed proof |
Treat Lens Quality as a Safety Check
Lenses are not decoration. They affect safety, compliance, perceived value, and return rates. At sample stage, confirm lens material, thickness, color, UV protection claim, lens category, coating, optical clarity, and any impact requirement for the destination market. Common lens materials include PC, TAC polarized, nylon, and CR39. Each material has different performance limits, processing limits, and cost.
Look through the lens at straight lines on paper, a window frame, or a grid. Strong bending, waviness, or a swim effect may signal optical distortion. Check for scratches, bubbles, black dots, tint spots, coating marks, edge chips, and stress near screws, rims, or shield mounting points. For polarized lenses, rotate the sample against a phone screen or another polarized lens to confirm the effect. Then make sure polarization is included in the written specification and price.
- Confirm lens material, thickness, base curve, and whether the lens is flat, curved, shield, rimless, or semi-rimless.
- Confirm the UV protection claim with supporting test data, not only with a sticker or printed tag.
- Confirm the lens category, usually based on visible light transmission and the destination market standard.
- Check coating and tint uniformity before assembly and again after assembly.
- Match compliance reports to the lens material, tint, category, model, and destination market.
A test report for one gray PC lens does not automatically cover a brown gradient TAC lens, a mirror-coated shield lens, or another lens category. Ask the supplier to identify the exact model, lens material, tint, category, and production period covered by the report.
Approve Logo Method, Position, and Durability
Logo decoration is where many private label sunglasses become inconsistent. Digital artwork may look clean, but the real frame has curves, texture, temple taper, hinge clearance, coating behavior, and limited flat space. Approve the logo on the physical sample. Not only on a mockup.
Common logo methods include laser engraving, pad printing, hot stamping, metal logo plates, lens logos, and inner temple markings. Each method has a proper use. Laser engraving can be durable on suitable materials, but it may look too subtle on clear or light colors. Pad printing is flexible and cost-effective, but ink adhesion must be checked after curing. Metal logo plates can create a premium look on thicker temples, but they need secure fixing and smooth edges. Lens logos must not interfere with the wearer's field of view.
| Logo Method | Best Use | Risk to Check | Approval Detail |
|---|---|---|---|
| Laser engraving | Inner temple codes, subtle branding | Low contrast or uneven depth | Approve readability, depth, and position |
| Pad printing | Temple logo, CE mark, style code | Ink rub-off or misalignment | Run an agreed adhesion and rub check after curing |
| Hot stamping | Metallic branding on suitable surfaces | Foil gaps, weak transfer, edge cracking | Approve coverage, color, and surface compatibility |
| Metal logo plate | Premium temple branding | Loose plate, sharp edge, glue overflow | Check fixing strength, edge smoothness, and comfort |
| Lens logo | Retail branding or lens identification | Oversized mark in the field of view | Approve size, opacity, and distance from the edge |
Specify logo size, color, orientation, distance from hinge, distance from temple edge, and whether the mark appears on the left temple, right temple, both temples, lens, pouch, or packaging. On a slim temple, a small shift is obvious. For bulk orders, keep one signed decoration sample at the production line and another with the QC team.
Confirm Packaging, Labels, and Cartons
Packaging is often pushed to the end. That creates risk. A good frame packed in the wrong pouch, labeled with the wrong barcode, or shipped in a weak carton can cause warehouse, retail, and customer-service problems. During sampling, approve the full packing set: lens film, microfiber pouch, cleaning cloth, hang tag, instruction sheet, polybag, retail box, inner carton, export carton, barcode label, and shipping mark.
Check material thickness, print clarity, fold strength, packing sequence, and carton layout. Thin microfiber pouches may shed lint on lenses. Weak boxes may crush during handling. Glossy dark boxes can show scratches. White boxes can show dirt and handling marks. A retail box that looks fine in a sample photo still needs to survive packing, stacking, warehouse receiving, and final delivery.
- Confirm the unit packing order, such as lens film, polybag, pouch, box, inner carton, and export carton.
- Scan barcode samples and verify SKU, color code, country code, and retail system format.
- Confirm warning text, lens category text, CE mark, importer details, and other market markings where required.
- Approve carton size, pairs per carton, gross weight, net weight, and shipping mark layout.
- Request basic handling checks for new, lightweight, e-commerce, or fragile packaging formats.
Packaging MOQ can differ from frame MOQ. Custom color boxes, printed cloths, special pouches, hang tags, and barcode labels may require separate setup charges, longer preparation time, or higher minimum quantities. Confirm these details before final sample approval and final price confirmation.
Use Sampling to Lock Cost, MOQ, and Lead Time
Sampling is not only a design review. It is also the point where price, MOQ, tooling, material purchase, and lead time should become clear. Ask the supplier to confirm what is standard, what is custom, what requires tooling, what has a separate packaging MOQ, and what may affect the production schedule.
Do not approve a sample that cannot be repeated at your target price or within your required timing. Injection molding can be efficient in volume, but mold changes are not casual. Acetate offers strong color depth and hand feel, but it requires cutting, tumbling, polishing, and manual adjustment. Polarized lenses, custom hinges, metal logo plates, mirror coatings, special packaging, and extra markings can all affect cost, lead time, and QC workload.
| Order Stage | Typical Quantity Logic | Cost Logic | Buyer Focus |
|---|---|---|---|
| Trial order | Small quantity for market testing | Higher unit cost because setup is spread over fewer pairs | Fit, photography, buyer feedback, retail presentation |
| Small reorder | Repeat quantity after initial demand is proven | Better efficiency if materials and packaging repeat | Color repeatability and packaging accuracy |
| Program order | Planned order across styles or colorways | Improved production planning and packing efficiency | QC sampling plan, delivery schedule, and document control |
| Volume order | Larger production run with stable specifications | Better price potential if design, materials, and packaging are fixed | Line control, inspection plan, shipment split, and approved samples |
Request a costed list of key choices before sign-off. If you change lens material, logo method, frame color, packaging, barcode format, or compliance marking after approval, expect the supplier to reassess cost, lead time, and sometimes the need for a revised sample.
Sign Off With a Control Plan
Before bulk production starts, turn the approved sample into a simple pre-production control plan. This is the bridge between the buyer, sales contact, sample room, material team, production line, packaging team, and QC team. It should be clear enough that a person who missed the sample discussion can still inspect the goods against the same standard.
The control plan should include incoming material checks, frame dimension checks, lens checks, decoration checks, assembly checks, cleaning checks, packaging checks, labeling checks, and final inspection requirements. In eyewear production, the risk is not only technical failure. Details can also get lost as information moves from the sample room to the production floor. A written control plan reduces that risk.
Keep at least two signed golden samples: one with the supplier QC team and one in your buyer file. Mark each sample with the date, PO number, model, colorway, lens type, packaging version, and signature. For larger or higher-risk orders, request first-article photos or first-article samples from bulk production before the full run continues. This can catch wrong logo placement, lens tint drift, hinge changes, assembly issues, or packing mistakes early.
- Do not approve bulk production from an unfinished or partial sample unless all open points are listed and controlled.
- Do not approve without checking both left and right sides of the frame and lenses.
- Do not change artwork, lens tint, frame color, or packaging after sign-off unless a revised approval is issued.
- Do not rely on verbal promises for compliance markings, barcode details, importer information, or carton marks.
A strong sample approval process protects both buyer and supplier. Clear standards make production easier to manage, inspections more objective, and disputes easier to resolve with evidence instead of opinions.
Have a custom sunglasses project in mind?
Send us your styles, target market and quantities and we will return a detailed quote with MOQ, lead time and a sample plan.
Get a QuoteWhy source this from Wenzhou with LumiShades
Wenzhou in Zhejiang Province is widely regarded as China’s eyewear manufacturing capital, producing a large share of the world’s sunglasses. That concentration matters to buyers: a deep local supply chain for acetate sheet, hinges, lens blanks, plating and packaging means shorter component lead times, easier color and material matching, and a workforce with decades of eyewear-specific skill. LumiShades has manufactured in this ecosystem since 2009, and our vertical integration — in-house injection molding, acetate cutting, CNC milling, lens tinting, decoration and quality control — means no part of your order is quietly subcontracted to a workshop you cannot audit.
For international buyers, that vertical control translates into accountability. When a single factory owns every step, defects are traced and fixed at source rather than bounced between vendors, and your specifications survive intact from first sample to bulk. We back this with 15+ years of experience, shipments to 60+ countries, more than 5 million pairs produced per year and a 98.5% on-time delivery rate. Our certifications — CE EN ISO 12312-1, FDA registration, ANSI Z80.3, AS/NZS 1067, REACH, ISO 9001 and BSCI audit — mean the compliance documentation your market requires already exists. Explore our manufacturing capabilities and quality control process to see how this works in practice.
Frequently asked questions
Can I approve bulk production from photos only? Only consider photo approval for a low-risk repeat order where the same supplier, model, material, lens, color, logo method, packaging, and compliance documents have already been approved and produced successfully. For a new custom sunglasses design, approve a physical sample. Fit, hinge feel, lens distortion, tint depth, logo adhesion, and packaging strength cannot be judged reliably from photos.
What should I do if the frame sample is right but the lens tint is wrong? Do not release full production. Record that the frame construction is acceptable, then request a corrected lens sample, lens swatch, or pre-production lens set. Approve the lens only after color, visible light transmission category, UV protection claim, material, coating, polarization if required, and applicable compliance coverage are confirmed in writing.
How should I compare a sample with the future bulk order? Create a signed approval sheet and keep golden samples. Compare bulk production against the approved dimensions, color standard, lens material and category, logo position, packaging components, barcode, labels, and carton marks. If the supplier proposes any change after approval, ask for written confirmation and decide whether a revised sample is needed before production continues.
Which compliance documents should I ask for before approval? Ask for documents that match your destination market and product specification. Common examples include CE marking supported by EN ISO 12312-1 for the EU, ANSI Z80.3 and FDA registration status for the US, AS/NZS 1067 for Australia and New Zealand, and REACH support for restricted substances. Check that the documents relate to the same lens material, tint, category, and model type you are buying.
How many golden samples should be kept? Keep at least two signed golden samples: one with the supplier QC team and one with your buying or product team. For larger, multi-shipment, or third-party inspected orders, keep additional controlled samples for production, final inspection, and the inspector. Label each sample with model, colorway, lens type, packaging version, PO number, approval date, and signatures.
Ready to start?
Explore our shield & oversized sunglasses or request a quote — our sales team replies within 12 hours.
Request a Quote